It’s been a while since my last post and over the course of 2024 I’ve been working on a rather big and exciting project. I got engaged late last year (wooop!) and as well as pretty much immediately diving into wedding planning, I knew that I wanted to make my own dress.
Still feeling cautiously optimistic, I felt like this project has come at a good time in my sewing journey – It’s a big challenge with lots of new things to learn, but I think I’ve developed enough skills to knew where to start.
I won’t be sharing much about the design of the dress before the big day, but I wanted to dedicate this first post to the research and organisation required to tackle such a large project.
Here’s one’s for the spreadsheet lovers.
As I looked for inspiration, I wanted a dress that would make me feel great as well as being enjoyable to make. That second part is easily forgotten as you scroll through dress designs – but there’s no point making a bias-cut dress if you hate sewing on the bias. Or a beaded dress? They’re stunning, but do you find it relaxing to remove beads from seam allowances or is it a bore?? There’s no universal right answer here, and if you fall in love with something that you absolutely don’t want to make then perhaps you do want to buy a dress after all! For sewists who get engaged there is a lot of pressure to make your dress yourself and I did want to mention that it may not be the right thing for everyone.
My favourite part of sewing is drafting patterns. I love making moulages, tweaking things until the fit is perfect, and I end up using muslin more than any other fabric. It takes a long time, especially because I can only sew on the weekends, but the year-and-a-half timeline seemed enough time to make something ambitious.
Part 1: The inspiration phase
I’m not someone who has always known what their dress would look like so I started pinning a variety of designs on a pinterest board. I found pinterest very helpful because photos come from a variety of sources and you can filter search results by body type. For obvious reasons I absolutely loved this feature!!
The second stage was to actually to go to a bridal boutique and I cannot stress enough how helpful this was. I went in with a clear idea of the bodice I wanted, but ended up hating it on! I also got to take a peek at the inside structure of the dresses. My sewing nerd brain was loving it.
Part 2: Research, research, research
I really went down some rabbit holes. Sewists are such lovely people and it is incredible how much information there is online about making your own wedding dress. If you’re after the details, I found blogs much more useful that youtube or instagram. I think this is because blogs are not written to be short and snappy – and I don’t want them to be! Here are some of the incredible people that have written about their dresses (in GREAT detail):
- Ella, Handmade Millenial
- Kat, Kat Makes
- Mary Funt, Cloning Couture
- Brittani, Untitled Thoughts
- Nina, Nina Lee Loves
- Charlie, This Blog Is Not For You
This may sound silly, but not only did these blog give me the information I needed, but also the confidence. Each blog I read referenced other blogs, eventually going back to about 2013… I felt like I was joining a long line of sewists that have made their dress and it made the project feel more doable. A heartfelt thanks to all of the bloggers!!
I also bought two books by Susan Khalje, “Bridal Couture” and “Couture Sewing”. Both of these books were invaluable for learning about speciality fabrics and construction techniques. From these books I learned the importance of dress’ mechanics, because it tends to be such a heavy thing. Everything about the dress is anchored to the waistline. The waist is usually the smallest part of the body and stays relatively stable in shape size during movement. The skirt hangs from the waist, and the bodice ‘stands up’ from it. If you’ve got a design with straps that may add some support, but most of the weight is carried through the waist.
Part 3: Organisation tools
There are so many elements to making your own stress – sourcing fabric, fitting the pattern, learning new sewing techniques, developing the right constructions method…
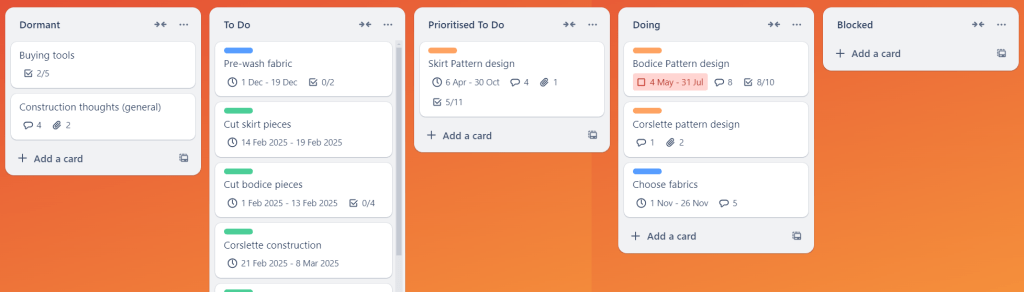
For me, the easiest tool to keep track of it all is Trello, which is a type of “Kanban board“. I’ve used it since uni and I feel like it most accurately represents the planning process.
What is a Kanban board?
A Kanban board is made up of cards, each of which represents a topic within a project. You place the cards in different columns depending on the current status of the card. For example, my default columns are:
- “Dormant” – cards that have not been started or currently not progressing
- “Prioritised to do”
- “Doing” – cards that are currently being worked on
- “Blocked” – cards that are blocked from progress for a specific reason (e.g. “waiting for fabric to arrive”)
- “Done“
The beauty of the Kanban board is that you can add comments to each card to track your progress, and move the cards around to see the project status at a glance. I’ve used the Trello app at work within a team, but I find it useful even if I’m the only one on the project.
This is what my Trello board currently looks like. Some cards track progress, others are a place to jot down ideas. Trello boards work best on the computer but the app isn’t bad either, and I sometimes update the board while on the train.
The second organisation tool was a spreadsheet. It’s not the prettiest solution out there but very useful to keep lists of measurements, fabric options, learning resources (blogs, books, random pdfs…).
Starting on the pattern…
With the design of my dress decided, I divided the pattern drafting phase into the following parts:
- Draft a basic skirt block + a bodice block (using Suzy Furrer’s method)
- Draft the outer bodice pattern
- Draft the skirt pattern
- Draft the corselette, which will be a zero-ease internal structure for the dress
I’ve probably written enough for one day, so more about the drafting process in the next post!

Leave a comment