While developing the skirt pattern for my wedding dress, I had a lot of very big pattern pieces to cut. I’m already not a big fan of cutting pieces, but now each version first required printing 40 pages of paper, sticking them together, cutting the paper and then cutting the fabric!
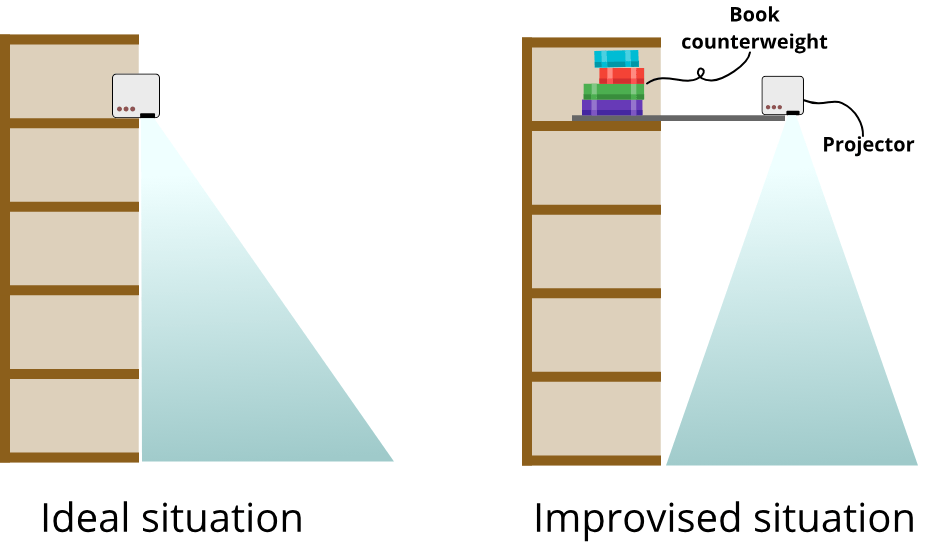
So I embarked on a journey of project sewing. I bought the AKIYO O1 Portable Projector, a little cheap projector recommended on projectorsewing.com. I had to somewhat procariously mount it on a whiteboard to extend the project over the floor where I wanted to cut. In an ideal situation, the project would cast from the edge of the shelf but I soon reached the limitations of the device.
I also noticed that the edges of the projection were not as sharp as the middle, so I tried to cut in the middle wherever I could.
The projector has to be calibrated every time you set it up in a different position. I drew a 50 x 50 cm square on my laptop which I cast onto the floor, and then measured it. The calibration is then simple: your new zoom % is:
Casting zoom = Current zoom * Casted square size / 50cm
What I learned…
My first day of projector sewing happened to be during a 6-film stars wars marathon, so I had PLENTY of time to cut out pieces. I cut 4 bodice sets for each of my bridesmaids’ dress toiles using the projector, and this is what I learned:
- Make sure your projector and laptop are SECURE before starting to cut. It’s easy to trip over a wire and mess up your whole calibrated setup…
- The closer your projector is to the piece, the better the resolution. Therefore for small pieces, set the project up closer to your cutting area.
- A darker room is (obviously) ideal
- It’s easier to cut one layer at a time, because once things start sliding it’s difficult to get it back. Trust me, I had cutting pieces and would much rather cut two layers, but in the end it was more hassle than it was worth. Also, I used plenty of weights on my pattern pieces but in the future I want to use magnets to hold down my fabric!

Leave a comment